Introducing the Multi-File Uploader (Free FileMaker Add-On)

Introducing the Multi-File Uploader (Free FileMaker Add-On)

Many teams need to attach more than one file at a time… photos, PDFs, spreadsheets, drawings. Out of the box, FileMaker selects a single file per action. The Multi-File Uploader add-on lets you drag-and-drop multiple files at once into your solution, much like you’d expect in modern web apps and storage tools.

You get: faster intake, fewer clicks, and a cleaner experience for staff who work with documents every day.


What you can do with it (examples)

  • Upload multiple files in one step to a record (photos, PDFs, spreadsheets, etc.).
  • Preview, download, or delete uploaded files from a simple portal.
  • Keep files with the record you’re viewing (customer, order, project, ticket).
  • Point storage to your own table if you already have a Documents/Files table.


Requirements & compatibility

  • FileMaker 19 or later (add-on support).
  • Works in hosted or local files.
  • Designed to drop onto any layout and link to that layout’s primary key.

Quick start (about 5 minutes)

1) Create the add-on bundle

  1. Open FileUploader-Addon.fmp12
  2. Click Create Add-on.
  3. When the script finishes, close FileMaker.


2) Install the add-on into your app

  1. Reopen FileMaker and open the target file (the file you want to enhance).
  2. In Layout mode, open the left pane → Add-ons → + Install Add-on.
  3. Select FileUploader and click Choose.
  4. In the Add-ons panel, drag the FileUploader icon onto your layout.
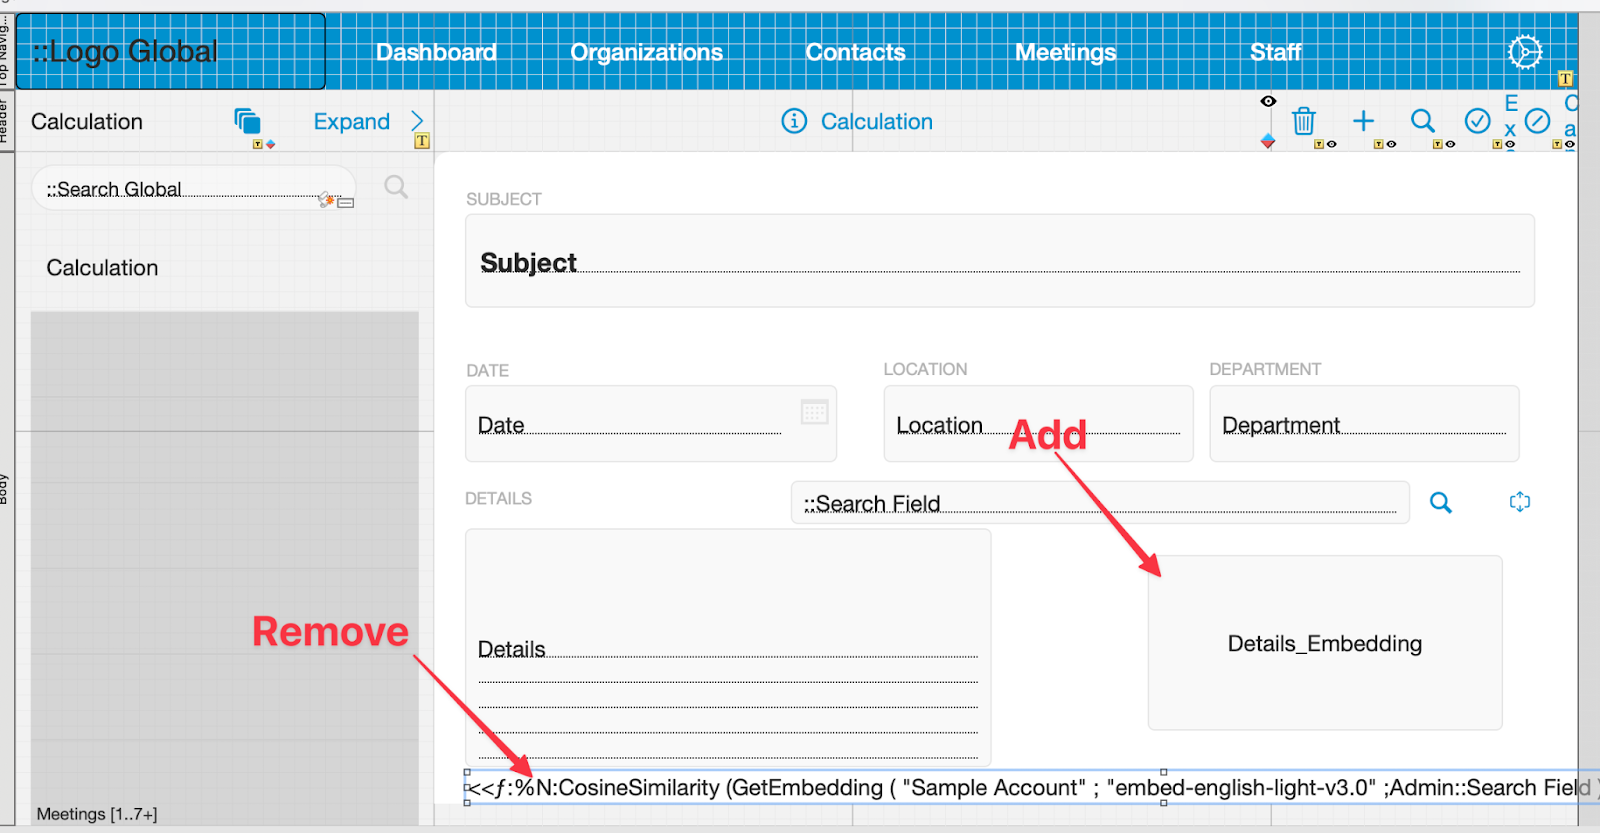
Configure it for your layout (important)

Note on sample code
These steps are examples. Please update layout names, table occurrences, field names, and any privileges to match your solution before deploying.

Open the script uploader_Upload File and make two small adjustments:

  • Tie uploads to your record


  • Change the value of the $id variable on lines 20 and 23 to use the primary key field of the layout’s base table
    (for example, Customers::CustomerID or Jobs::JobID).


  1. Choose where files are stored


  • By default, files are saved in the included uploaderFiles table.
  • If you keep documents elsewhere, update lines 33–37 in uploader_Upload File to target your own Documents/Files table and fields.


How to use (day-to-day)

  1. Click the blue “Upload Files” button.
  2. Drag and drop one or more files into the pop-up window.
  3. Click Upload to attach them to the current record.

Uploaded items appear in the portal below the button, where users can preview, download, or delete files as needed.

How it fits in real workflows

  • Field service or inspections: Drop in photos and checklists from a visit. No extra steps.
  • Sales and account records: Keep proposals, SOWs, and change orders with the customer.
  • Operations and projects: Store drawings, packaging specs, or vendor certifications on the job.
  • Support tickets: Attach screenshots and logs to speed up resolution.

Styling tips

  • Restyle the button and portal objects to match your theme.
  • Consider a card-style container for the file list (light background, subtle border).
  • If your theme has specific button/icon styles, apply them to the uploader controls.

Security & deployment

  • Apply privilege sets so only the right roles can upload or delete files.
  • If you change the storage table, confirm that accounts have the correct record and field access.
  • Test on a copy of your file before rolling out to production users.

Troubleshooting

  • Add-on not visible? Confirm you ran Create Add-on and restarted FileMaker before installing.
  • Files not linking to the right record? Re-check the $id assignment on lines 20 and 23 of uploader_Upload File.
  • Files not appearing in your table? If you pointed storage to a custom table, verify lines 33–37 and field mappings.
  • Portal looks empty? Ensure the portal is pointed at the correct related table occurrence and that the relationship uses your record’s primary key.

Special Thank You

The Multi-File Uploader would not be possible without Jason Wood of Define Database’s work. Jason originally created this tool for usage in S3, which we then converted for use in Filemaker. You can learn more about his original work here. Thank you Jason!


Download and next steps

If you would like a hand, we can help you drop the add-on onto a layout, point it to your primary key, and adjust the storage table. A short working session is often enough.

Appendix (for power users)

  • Consider adding a server-side cleanup routine (e.g., remove orphaned files if a record is deleted).
  • If you need versioning (v1, v2 files), add a simple counter field and include it in the file name on upload.
  • For large files, provide a progress indicator (conditional object tied to a “busy” flag set during upload).
  • If you keep documents externally (S3, Azure), adapt the storage portion of uploader_Upload File to write URLs and use a signed URL pattern for downloads.

Multi-File Uploader Add-on Download File

Please complete this form to download the FREE file.

This field is for validation purposes and should be left unchanged.
Name(Required)

Can Your FileMaker Do This? Mini JSON Use Cases

1) A readable audit trail without extra fields

What: Keep a simple change log per record as JSON (who changed what, and when).
Why: Easier reviews and handoffs; no more scattering “_old/_new” fields across the table.
How: On commit, append one JSON entry to an “AuditJSON” field.

// Append one change entry (example for a Status change)

Set Variable [ $entry ;

  JSONSetElement ( “{}” ;

    [ “timestamp” ; Get ( CurrentTimestamp ) ; JSONString ] ;

    [ “user” ; Get ( AccountName ) ; JSONString ] ;

    [ “field” ; “Status” ; JSONString ] ;

    [ “from” ; $$old_Status ; JSONString ] ;

    [ “to” ; Status ; JSONString ]

  )

]

Set Field [ Table::AuditJSON ; List ( Table::AuditJSON ; $entry ) ]  // one JSON per line


2) A safe outbound “API outbox” (with retry)

What: Queue JSON payloads for external systems (ERP/CRM/shipping) with a status flag: Queued, Sent, Failed.
Why: Network hiccups happen; a queue prevents lost or duplicate updates.
How: Write payloads to an Outbox table; a server script (or Claris Connect) posts and updates status.

Set Variable [ $payload ;

  JSONSetElement ( “{}” ;

    [ “orderId” ; Orders::OrderID ; JSONString ] ;

    [ “total” ; Orders::Total ; JSONNumber ] ;

    [ “items” ; Orders::ItemsJSON ; JSONObject ]  // your own items JSON

  )

]

New Record/Request

Set Field [ Outbox::Endpoint ; “https://api.example.com/orders” ]

Set Field [ Outbox::Payload  ; $payload ]

Set Field [ Outbox::Status   ; “Queued” ]


3) Validate incoming JSON before it touches your fields

What: Confirm required keys and data types with JSON functions.
Why: Protects your schema; stops odd values at the door.
How: Use JSONListKeys and JSONGetElementType to check presence and types.

Set Variable [ $body ; $$IncomingJSON ]

If [ PatternCount ( ¶ & JSONListKeys ( $body ; “” ) & ¶ ; ¶ & “email” & ¶ ) = 0

  or JSONGetElementType ( $body ; “email” ) ≠ “string” ]

  Show Custom Dialog [ “Incoming JSON missing a valid email.” ]

  Exit Script

End If


4) Drive picklists and rules from JSON (no schema change)

What: Store business rules (allowed statuses, thresholds) in JSON so small changes don’t require schema edits.
Why: Faster updates; fewer trips through the relationship graph.
How: Keep rules in a Settings table, load to a global on first use.

// Settings::RulesJSON example: { “StatusOptions”: [“New”,”Packed”,”Shipped”] }

Set Variable [ $$rules    ; Settings::RulesJSON ]

Set Variable [ $$statuses ; JSONListValues ( $$rules ; “StatusOptions” ) ]

// Use $$statuses in a value list or custom UI


5) Hand a “view model” to a Web Viewer

What: Build a small JSON view model for a record and let HTML/JS render cards or charts.
Why: Clear separation: FileMaker gathers data; the viewer handles visuals.
How: Assemble JSON and pass it as a parameter or via a global field.

Set Variable [ $$vm ;

  JSONSetElement ( “{}” ;

    [ “customer” ; Customers::Name ; JSONString ] ;

    [ “balance”  ; Customers::AR_Balance ; JSONNumber ] ;

    [ “orders”   ; Customers::RecentOrdersJSON ; JSONObject ]  // prebuilt JSON

  )

]

// Web Viewer page reads $$vm and renders


6) A tidy JSON summary for BI (Power BI/Tableau)

What: Normalize your data once into JSON and expose it via an OData layout for BI tools.
Why: One shaping step in FileMaker keeps dashboards simple downstream.
How: Write a “staging” JSON per row in a BI_Staging table that your OData layout publishes.

Set Variable [ $row ;

  JSONSetElement ( “{}” ;

    [ “OrderID”   ; Orders::OrderID ; JSONString ] ;

    [ “ItemCount” ; ValueCount ( JSONListValues ( Orders::ItemsJSON ; “” ) ) ; JSONNumber ] ;

    [ “OrderDate” ; Orders::OrderDate ; JSONString ]

  )

]

Set Field [ BI_Staging::RowJSON ; $row ]   // include this field on the OData layout


How to try this (quick plan)

  1. Pick one use case above (audit trail or validation is a good start).

  2. Build a small script in a copy of your file; test with a few records.

  3. If it helps, add a Claris Studio form or a Claris Connect step to round out the flow.

  4. Share a short demo with your team and note the time saved or errors avoided.

Note on sample code
The snippets below are examples. You’ll need to adapt names and context to your solution before running them. In particular, update:

  • Layout names (e.g., Orders_list, Customers_edapi)

  • Table occurrences and field names (paths used in JSON and scripts)

  • Portal/table occurrence names for portalData and related writes

  • Privileges and triggers (who can run it, when it should fire)

  • Error handling (Get( LastError ), logging, retries)

  • Publishing context for BI (place fields on your OData layout)

Web Viewer handoff method (global field, script parameter, etc.)


What is OData and How FileMaker Makes Data More Accessible

 If you’re managing data in FileMaker and exploring better ways to integrate with analytics or enterprise platforms, you’ve probably heard the term OData. But what is it, and why should FileMaker users care?

What is OData?

OData (Open Data Protocol) is a standardized way for systems to share data over the web, similar to how web pages are served to browsers. Think of it as a universal language that lets applications query, read, and write data through familiar web protocols like HTTP.

Created by Microsoft, OData is widely used across industries to connect databases to business intelligence tools, ERPs, and reporting dashboards.

What is the FileMaker OData API?

FileMaker now includes its own OData API, available on FileMaker Server 19.1 and later. This feature exposes FileMaker data using the OData v4 standard, meaning that you can connect your FileMaker databases directly to tools like:

  • Microsoft Power BI

  • Tableau

  • Excel (Power Query)

…and many other platforms that support OData. In addition it adds powerful capabilities to work with FileMaker server data including the ability to modify and create data structures programatically.  This feature is a major breakthrough for FileMaker Developers and promises powerful future capabilities for managing advanced FileMaker applications.

Why It Matters

If you’ve ever wanted to:

  • Build live dashboards in Power BI using FileMaker data

  • Query data from FileMaker without custom APIs or exports

  • Integrate FileMaker into larger enterprise data strategies

  • Open FileMaker applications for more advanced capabilities

…the OData API is a game-changer.

It means:

  • Less custom development to connect FileMaker to other systems

  • Standardized querying across platforms

  • Real-time data access for reporting and analytics

  • Improved FileMaker application support

What’s the Difference Between OData and FileMaker OData API?

  • OData: A universal protocol for data querying and manipulation.

  • FileMaker OData API: FileMaker’s specific implementation that lets external tools communicate with FileMaker databases using OData standards.

Is It Time to Upgrade?

If you’re on an older FileMaker Server version or still exporting data to spreadsheets, it’s time to explore how the FileMaker OData API can streamline your workflows.

Contact us today to discuss how we can help you unlock real-time data access and smarter analytics with FileMaker and OData.


Can Your FileMaker Do This: FileMaker vs AI Built Apps vs Enterprise Suites Guide

Can Your FileMaker Do This? FileMaker, AI-Built Apps, and Enterprise Suites: A Practical Guide

Teams have great options today. Enterprise suites like Salesforce or Oracle bring breadth and governance. AI-built apps (custom code with GPT-style copilots) offer full creative freedom. FileMaker 2025 (with Claris Studio + Claris Connect) adds a low-code layer for the everyday work: forms, approvals, exceptions, and quick changes.

This is about picking the right tool and helping them work well together.

The Landscape (What Each Does Best)

Enterprise Suites (Salesforce/Oracle/etc.)
Ideal as systems of record with strong data models, compliance, and mature ecosystems. Strong for standardized processes that don’t change often.

AI-Built Apps (custom code + copilots)
Great for new experiences and bespoke logic when you want full UI freedom or internet-scale delivery.

FileMaker 2025 (with Studio + Connect)
A natural fit as the operations layer for departmental workflows, field capture, and dashboards (the work that shifts month to month and involves real people and real context).

Why FileMaker (What It Does Uniquely Well)

  • Operations-in-a-box: Data, UI, scripts, and security in one place, so changes are fast and safe.

  • Governed agility: Roles, logging, and auditable changes without a sprawling codebase.

  • Field-ready inputs: FileMaker Go + Claris Studio handle photos, scans, GPS, signatures. No custom app required.

  • Event-driven automation: Event-Driven Connect turns record changes into Slack/Teams alerts, tickets, emails, and documents.

  • Standards at the edge: OData (Power BI), Data API/eDAPI, and JSON for clean hand-offs to the broader stack.

  • Incremental modernization: Keep Salesforce/Oracle steady; add FileMaker where hands-on work happens. Quick wins, low disruption.

Who tends to benefit most

  • Departments of 10–200 daily users (Ops, Supply Chain, Field Service, QA, Facilities, Finance Ops)

  • Teams juggling spreadsheets, email approvals, and plug-ins

  • Organizations that need mobile/web data capture without funding a full custom app build

Where Each Typically Wins

Enterprise suites are strong for: deep modules (CPQ/ERP), strict compliance, global scale with unified governance.

AI-built apps are strong for: highly branded, external-facing portals; novel algorithms/services; full framework freedom.

FileMaker is strong for: rapidly evolving or highly custom internal workflows, immediate field capture, event-driven automations, and fast time-to-value.

How FileMaker Works Alongside Salesforce/Oracle

Common patterns

  • Keep the system of record in Salesforce/Oracle.

  • Use FileMaker as a system of engagement where people enter, review, approve, and act.

  • Bridge them with:

    • Claris Connect for “when X happens → do Y” workflows

    • Data API/eDAPI for JSON hand-offs

    • OData for analytics in Power BI/Tableau

    • SSO (Okta/Azure AD) for unified identity

Example flows

  • Case Management: A case in Salesforce triggers a FileMaker triage workspace (Studio forms + dashboards); updates return to Salesforce.

  • Manufacturing/Logistics: Oracle holds inventory; FileMaker handles receiving, QC, and exceptions on the floor; results sync back via Connect/Data API.

  • Healthcare/Education: Core records live in the suite; FileMaker covers mobile intake, audits, and scheduling with role-based access.

Quick Start (Non-Technical)

  1. Choose one pain point outside the suite (spreadsheets, email approvals, field capture).

  2. Mirror the workflow in FileMaker/Studio: one browser form + one small dashboard.

  3. Connect to Salesforce/Oracle via Connect or Data API (start one-way, then add updates).

  4. Trigger actions on events (status change → Slack/Teams → ticket/doc/email).

  5. Pilot for two weeks and measure time saved, fewer errors, and faster visibility.

Next step: Want to see how this can look in your environment? We can stand up one FileMaker/Studio workflow, one automation, and one suite integration so you can evaluate impact before scaling.


How to Send Emails from FileMaker Using SendGrid

One of the most commonly requested features in FileMaker solutions is the ability to send emails directly from within the app. However, recent updates to Microsoft Outlook and Google’s SMTP services have created reliability issues—emails sometimes fail to send or even crash FileMaker. To address this, we’ve helped many clients transition to SendGrid.

SendGrid is a cloud-based email delivery service that you can control using API calls from FileMaker. It’s reliable, scalable, and straightforward to implement (though there are a few setup nuances). To simplify this even further, we’ve created a Kyologic SendGrid Add-On, which can be easily adapted to support most email-sending use cases, including attachments.

This guide will walk you through:

  • Creating and authenticating a SendGrid account

  • Upgrading your plan

  • Generating an API key

  • Installing and testing the Kyologic SendGrid Add-On in your FileMaker file

Step 1: Authenticate Your Domain in SendGrid

  1. Visit sendgrid.com and click “Start for Free” to create your account.

  2. Once logged in, go to Settings > Sender Authentication from the sidebar.

  1. Click “Authenticate Your Domain”.

  1. Choose your DNS host provider (e.g., GoDaddy, Cloudflare) and select any tracking link options you prefer. Click Next.

  1. Enter your domain name (e.g., yourcompany.com) and click Next.

  2. SendGrid will generate a list of CNAME and TXT records you need to add to your DNS settings.

    Note: Some DNS providers automatically append your domain name to records. For example, if SendGrid gives you em4554.yourcompany.com, and your provider adds yourcompany.com automatically, you should enter just em4554 as the record name.

  3. If you manage your domain, log in to your DNS account and add each of the records.
    If someone else manages your DNS:

    • Click the “Send to a Coworker” tab in SendGrid.

    • Enter their contact information so they receive the setup instructions.

  4. Once you’ve added the DNS records, return to SendGrid, check “I’ve added these records”, and click Verify.
    ✔️ Proceed only after Sender Authentication shows as Verified.


Step 2: Upgrade to a Paid SendGrid Plan

SendGrid’s free plan has very limited functionality. We recommend upgrading to the Essentials Plan.

  1. In SendGrid, go to Settings > Account Details.

  2. Click the “Your Products” tab.

  3. Under Email API, select the Essentials plan (~$20/month for up to 50,000 emails).
    ✉️ Important: One email = one recipient. An email with 1 TO, 1 CC, and 2 BCCs counts as 4 emails against your monthly quota.

  4. Enter your billing details to complete the upgrade.


Step 3: Create and Save Your API Key

An API key allows FileMaker to communicate securely with SendGrid.

  1. Go to Settings > API Keys in the SendGrid sidebar.

  2. Click “Create API Key”.

  3. Enter a name for your key (e.g., FileMaker Email Integration).

  4. Select Restricted Access.

  5. Under Mail Send, toggle on the permission for Mail Send.

  1. Leave all other permissions off.

  2. Click “Create & View”.

  3. Copy the API Key and save it somewhere secure (like a password manager). This is the only time you will be able to see it.

Step 4: Set Up the Kyologic SendGrid Add-On in FileMaker

  1. Download the Kyologic SendGrid Add-On. [Insert download link here]

  2. Unzip the download.

  3. Close FileMaker Pro on your computer.

  4. Move the unzipped add-on files to the following folder on your machine:
    [Your User Directory]/Documents/FileMaker/Addons/AddonModules
    ⚠️ FileMaker Bug Alert: If you have multiple add-ons in the AddonModules folder, FileMaker may import the wrong one. To avoid this, temporarily clear out the folder before installing the add-on.

  5. Open FileMaker Pro.

  6. Open your FileMaker solution.

  7. Go to any layout and enter Layout Mode.

  8. In the Add-Ons tab (usually on the left), click the + button at the bottom.

  9. Select the SendGrid Add-On from the list.

  10. This will add a new layout to your file called SendGrid_SampleData. Navigate to that layout.

  11. Enter the API Key you created earlier into the appropriate field.

Step 5: Test the Integration

  1. In the SendGrid_SampleData layout, fill in the following fields with valid values:

    • From Email

    • To Email

    • Subject

    • Email Body

  2. Click Send.

  3. Confirm the email is delivered successfully.

You’re All Set

You’ve now authenticated your domain, created a secure API key, installed the Kyologic SendGrid Add-On, and successfully sent an email through FileMaker via the SendGrid API.

If you’d like help customizing this integration or building more advanced workflows (like scheduled sends, logging, or error handling), feel free to reach out to our team.

SendGrid Add-on Download File

Please complete this form to download the FREE file.

This field is for validation purposes and should be left unchanged.
Name(Required)

Installing Local LLM for FileMaker – Made Simple!

🚀 Join Us Live! Want to see this setup in action? We’ll be showcasing the full installation and implementation of Local LLM for FileMaker live at our upcoming CFDG meetup. Don’t miss this hands-on session where you can ask questions and see everything in real time.


🔗 Reserve your spot here


1. Create Ubuntu Server

Below are instructions for creating an Ubuntu 24.04 server using AWS EC2. These instructions should be similar for other cloud services like Microsoft Azure.

Launch a New EC2 Instance

  1. In AWS EC2, click Launch Instance
  2. Select the following options
    • AMI – Ubuntu 24.04 (x86)
    • Instance Type – t3a.large (or your preferred size)
    • Key Pair – Select or create a new key pair
    • Subnet – Choose an appropriate subnet (e.g., us-east-1c)
    • Security Groups – Ensure SSH (port 22), HTTP (port 80), and port 8080 are open
    • Storage – ~30GB recommended
    • IAM Role – If you have an instance profile with needed permissions, select it here (optional but recommended)

Create and Associate an Elastic IP

  1. Reserve a new Elastic IP in AWS
  2. Associate it with your new EC2 instance
  3. In your DNS settings, create an A record pointing to the Elastic IP

Connect to the EC2 Instance

Use AWS Systems Manager Session Manager or SSH

2. Update Ubuntu

After connecting, update your instance
sudo -i
sudo apt update && sudo apt upgrade -y
sudo apt dist-upgrade -y
sudo apt autoremove -y
sudo shutdown -r now
Reconnect after the reboot.

3. Download Open Source LLM Files

📌 Important – If you’ve upgraded from FileMaker Server v20, ensure you have the latest FileMaker Server v21 version of the Open Source LLM files.
🔗 Download Open_Source_LLM.zip
Download directly to your server
cd ~
sudo apt install zip
sudo wget https://kyologic.com/wp-content/uploads/2025/02/Open_Source_LLM.zip -O /home/ubuntu/Open_Source_LLM.zip
sudo unzip Open_Source_LLM.zip
Set Read & Write Permissions to letsencrypt directory
sudo chown -R ubuntu:ubuntu /home/ubuntu
sudo chmod -R a+rx /home/ubuntu
Remove Unneeded Files
sudo rm Open_Source_LLM.zip
sudo rm -r __MACOSX
OR
Transfer the files to your server from your computer
scp -i "/local/path/to/keypairfile" -r /local/path/to/Open_Source_LLM ubuntu@your-server-ip:/home/ubuntu/

4. Install Certbot for SSL

Use Certbot to manage SSL certificates
cd ~
sudo snap install core && sudo snap refresh core
sudo snap install --classic certbot
sudo ln -s /snap/bin/certbot /usr/bin/certbot
sudo shutdown -r now
Reconnect after the reboot.

5. Configure Firewall

cd ~
sudo ufw allow ssh
sudo ufw allow 80/tcp
sudo ufw allow 8080/tcp
sudo ufw enable

6. Obtain an SSL Certificate

Ensure DNS is pointed to your server’s IP before running the following
Note – Replace llm.mydomain.com with your domain name.
sudo certbot certonly --standalone --preferred-challenges http -d llm.mydomain.com --dry-run
sudo certbot certonly --standalone --preferred-challenges http -d llm.mydomain.com
Enable auto-renewal
sudo systemctl enable snap.certbot.renew.timer
  Configure Hooks for Auto-Renew
Certbot needs to open port 80 temporarily when renewing.
Create pre- and post-hook scripts
cd /etc/letsencrypt/renewal-hooks/pre
sudo nano pre-hook.sh
  Contents of pre-hook.sh
#!/bin/bash
# Open port 80
ufw allow 80/tcp
Save (Ctrl+O, Enter) and exit (Ctrl+X). Then make executable
sudo chmod +x pre-hook.sh
cd /etc/letsencrypt/renewal-hooks/post
sudo nano post-hook.sh
  Contents of post-hook.sh
#!/bin/bash
# Close port 80
ufw deny 80/tcp
#Reboot Server
sudo shutdown -r now
Save (Ctrl+O, Enter) and exit (Ctrl+X). Then make executable
sudo chmod +x post-hook.sh
  Test renewal
sudo certbot renew --dry-run
This should reboot your server

7. Generate Admin PKI Keypair & JWT for Authentication

  1. Download Soliant’s SSH Key & JWT Tool
  2. Open in FileMaker
  3. Create a new record
  4. Enter a Name & # of expiration days
  5. Press the Generate Keypair & Generate JWT buttons
Add Admin PKI Public Key file
sudo mkdir /etc/letsencrypt/auth_key
sudo nano /etc/letsencrypt/auth_key/localllm.key.pub
Copy the Public Key from SSH Keys & JWT to your clipboard. Paste the Public Key in the localllm.key.pub file. Save (Ctrl+O, Enter) and exit (Ctrl+X).   Add Admin PKI Private Key file
sudo nano /etc/letsencrypt/auth_key/localllm.key
Copy the Private Key from SSH Keys & JWT to your clipboard. Paste the Private Key in the localllm.key file. Save (Ctrl+O, Enter) and exit (Ctrl+X).   Set Read & Write Permissions to letsencrypt directory again
sudo chown -R ubuntu:ubuntu /etc/letsencrypt
sudo chmod -R a+rx /etc/letsencrypt

8. Install Miniconda & Python Environment

Install Miniconda
cd /home/ubuntu
mkdir -p ~/miniconda3
sudo wget https://repo.anaconda.com/miniconda/Miniconda3-latest-Linux-x86_64.sh -O ~/miniconda3/miniconda.sh
bash ~/miniconda3/miniconda.sh -b -u -p ~/miniconda3
sudo rm ~/miniconda3/miniconda.sh
source ~/miniconda3/bin/activate
conda init --all
Create & activate Python environment
conda create --name <name>
conda activate <environment name>
conda install python=3.9.18
pip install jwt && pip uninstall PyJWT && pip install PyJWT
conda install -c conda-forge sentence-transformers
Install Open Source LLM dependencies
pip install -r /home/ubuntu/Open_Source_LLM/requirements.txt
sudo shutdown -r now

9. Run & Test the Local LLM Server

Set environment variables
sudo chown ubuntu:ubuntu /home/ubuntu/ -R
sudo chmod -R 755 /home/ubuntu
sudo chmod 700 ~/.ssh
sudo chmod 600 ~/.ssh/authorized_keys
sudo shutdown -r now
export PKI_KEYFILE="/etc/letsencrypt/auth_key/localllm.key.pub"
export CERTFILE="/etc/letsencrypt/live/llm.mydomain.com/fullchain.pem"
export KEYFILE="/etc/letsencrypt/live/llm.mydomain.com/privkey.pem"
conda activate <environment name>
Run python
python3 /home/ubuntu/Open_Source_LLM/server/fm_LLMOS_StartServer.pyc
📌 Test connection using the Claris Academy AI Fundamentals demo file.
  • Open Meetings_Solution in FileMaker
  • On the initial layout ( Meeting Details), enter Layout Mode and remove the Layout Calculation at the bottom of the page and add the field Details_Embedding to the layout.
  • Open the Script Workspace and find the Configure AI Account script
    • Adjust the Configure AI Account script step
      • Model Provider – Custom
      • Endpoint – https://llm.mydomain.com:8080
      • API key – copy and paste the JWT from SSH Keys & JWT file
  • Now Navigate to the Embedding Details Data script
    • Adjust the Insert Embedding script step
      • Embedding Model – all-MiniLM-L12-v2
  • Clear out the contents of the Details_Embedding field script
  • Run the Embedding Details Data script
  • Check and confirm that there were no errors and you have a new .fve file in the Details_Embedding field.
Keep this file open, we will use it to run a few more tests in the upcoming steps.

10. Automate the LLM Server with PM2

Create a pm2.io account.
Enter a Bucket Name You should now see this screen
Install PM2 and link to your account
If you are still in the conda command, enter ^C to exit.
sudo shutdown -r now
sudo -i
sudo apt install npm -y
npm install -g pm2
pm2 link [[Keys from PM2 Website]]
You should now see a new message on the PM2 web page saying you are linked
shutdown -r now
Start the server process with PM2
conda activate <environment name>
CERTFILE="/etc/letsencrypt/live/llm.mydomain.com/fullchain.pem" KEYFILE="/etc/letsencrypt/live/llm.mydomain.com/privkey.pem" PKI_KEYFILE="/etc/letsencrypt/auth_key/localllm.key.pub" pm2 start python3 --name <environment name> -- /home/ubuntu/Open_Source_LLM/server/fm_LLMOS_StartServer.pyc
  Test
Go to FileMaker, clear Details_Embedding field
Run the Embedding Details Data script
Verify a new .fve file in the Details_Embedding field.
Save the process & enable auto-start
pm2 save
pm2 startup
It will return a command looking something like this: sudo env PATH=$PATH:/usr/bin /usr/local/lib/node_modules/pm2/bin/pm2 startup systemd -u ubuntu –hp /home/ubuntu
Copy and paste the command and press Enter
sudo shutdown -r now
  Final Test
Go to FileMaker, clear Details_Embedding field
Run the Embedding Details Data script
Verify a new .fve file is created
🎉 Success! Your Local LLM Server is now running on Ubuntu 24.04 with automated startup.

🚀 See This in Action!
Want a live walkthrough of setting up Local LLM for FileMaker on Ubuntu? Join our Connecticut FileMaker Developers Group (CFDG) meetup where we’ll demo this setup step by step and answer all your questions!
🔗 Register here

FileMaker Pro vs Zoho

Claris FileMaker Pro and Zoho are both popular database solutions. If you’re shopping around for a database that works well for your business, deciding between the two may feel overwhelming, or even confusing. But, there are several important differences between the two, and knowing these differences may help make your decision easier.

Zoho

Zoho CRM’s Creator Tools are a low-code development platform designed for drag and drop application building. It comes with over 60 applications prebuilt, making it easy for those with no knowledge to snap something together (relatively) easy.

This accessibility translates to its entry fees. Zoho has a free trial that’s fairly limited: it only allows for a maximum of two users and three applications. However, it does allow small businesses to take it for a “test drive” at no cost. 

It also allows for slightly more flexibility in terms of pricing. Although it’s cost for individual users is more expensive ($25 per month per user for Zoho vs $19 per month per user for FileMaker Cloud), Zoho allows for single person accounts. FileMaker Cloud requires 5 users at minimum.

Zoho offers unlimited users which (pricing notwithstanding) makes scalability easy as businesses grow.

Zoho offers one major thing FileMaker does not: native Android support. There’s a Zoho app for both Apple and Android devices, making it easy to access regardless of the device employees are using. While Android users can use FileMaker, they have to do it via FileMaker’s web tool, WebDirect (as opposed to an application).

Claris FileMaker Pro

FileMaker Pro is also a database solution, this one a RDBMS (relational database management system) with its own front-end GUI. Frankly, it may not be as simple out-of-the-box as Zoho. Zoho prioritizes making things as easy as possible, while FileMaker can be incredibly powerful in the hands of the right developer. It may not be as intuitive for the average person, but virtually any database solution is possible through FileMaker.

Claris Connect also allows FileMaker Pro to interface with virtually any existing application. If your team already uses Outlook or Slack (or any other number of software), FileMaker Pro can easily communicate with them. It effectively slots into your existing infrastructure. It’s that simple.

That flexibility and simplicity can also be found in FileMaker’s reporting features. FileMaker Pro automatically creates table, list, and form views as databases and forms are added. Scripting and customization can all be done within the GUI with very limited coding knowledge.

FileMaker Pro also allows for scalability. The platform itself allows for nine simultaneous users, which at first glance, isn’t many. But FileMaker Server means that you can rent out servers as you grow, for hundreds of consecutive users accessing the database.

It should be no surprise that FileMaker Pro’s security measures are equally as flexible. Administrators can restrict users down to the most granular level, so departments or individual employees can access some databases, layouts, or fields and not others.

Conclusion

Zoho is a great alternative for smaller businesses and those who have no experience with building out low-code and no-code platforms. For small businesses that anticipate fewer than 4 users, it may even be cheaper.

Of course, Zoho doesn’t scale as well from a pricing perspective. FileMaker’s minimum of 5 users at $19 per month is  a total of $95. That’s already $5 less than 4 users on Zoho. As the number of users increases, so too will the pricing disparity.

While Zoho can be great (especially for smaller businesses), FileMaker Pro offers better pricing and potentially more flexibility and options in the long-term. This is especially true in the hands of a capable development team. If you want to learn more about developing custom platforms for your business, you can contact Kyo Logic here.

Claris FileMaker is About to Have a New Name

At its most recent Webinar update, Claris announced a name change that will impact its offerings. Long-time FileMaker users are probably aware this isn’t the first time the tech giant has changed names; Claris previously changed its name to “FileMaker” and then back to Claris in recent years.


What does this mean for Claris products? There’s a naming overhaul planned and a spiffy new gradient visual branding to go along with it. The name changes themselves are as follows:

  • FileMaker Pro is now Claris Pro
  • FileMaker Server is now Claris Server
  • FileMaker Go is now Claris Go
  • Claris Connect is now Claris Studio


It’s a pretty simple change to understand, and one that customers will pick up on quickly. Claris is ditching the “FileMaker” moniker and branding everything with the parent name. Interestingly, Claris promised that while Claris Studio will contain what used to be Connect, it will also be the umbrella for “new stuff.” Claris Vice President of Engineering, Peter Nelson, describes the new stuff as “functionality that will be available as part of the Claris platform.” While they didn’t get into the details, it sounds like they’ve got big plans in terms of expanding on what they offer their customers. Claris is anticipating the initial release of Claris Studio this fall.


Claris sees this as a way to create a central identity across all platforms while also allowing for better integration between platforms. This change will also make it easy for new clients to adopt these platforms. Claris also assures their existing users that nothing will fundamentally change for existing platforms. To put it more bluntly, these preexisting platforms won’t break as Claris updates their offerings.


Of course, this is just the foundation Claris is placing, and they promise to have more in store in the near future. At Kyo Logic, we’ll be sure to monitor and update as Claris rolls out new developments. We’re excited to continue to use Claris tools to create the best custom platforms and databases for our clients.

The Power of the Pomodoro – Time Management in the COVID World

The world we live and work in has changed drastically over the past few months, since COVID-19 entered our lives. It has been the biggest change that most of us have ever gone through. While this change has affected us in every aspect, from traveling, to socializing, to going to the grocery store, it has affected us equally in the workplace.

For the first time ever, it is now the rule as opposed to the exception to work from home. Thousands of companies are transitioning to full time remote workforces and this trend will not go away even if COVID-19 does. While it is certainly comfortable and easy to roll out of bed and start working, it is natural to lose focus more easily than when you were in the office.

If your new virtual work life has made it focusing on your work difficult, know that you are not alone and that we have a technique just for you. This is a technique that we at Kyo Logic have adopted for years and have found brings great results to our team, allowing our developers to focus on the task at hand even when all of the distractions in the world circulate around them.

The technique we use is called the Pomodoro, named after a tomato-shaped timer that the original inventor of the technique, Francesco Cirillo, used. 

The technique is pretty simple. You spend 25 minutes working on a task and then take a 5 minute break, making each Pomodoro 30 minutes. Now, there are no rules saying you have to do Pomodoros in 30 minute intervals. At Kyo Logic, we have modified our Pomodoros to be 60 minutes with 50 minutes working and a 10 minute break.

The reason why the Pomodoro is a powerful tool is because of two key factors: 

1. It breaks up your day into multiple smaller periods, allowing you to focus each period on a single task. Everybody has been there on a day where you have more on your plate than you can possibly accomplish. It’s petrifying and can get overwhelming. We have seen that a side effect of having too much on your plate is that you spread your focus around to too many tasks, ultimately completing none of them. If you start your day by scheduling out your Pomodoros, you can know that as long as you follow the plan, you will get to everything you need. No need to worry!

2. It includes short, frequent breaks, which allow you to clear your mind, handle the items that would normally distract you from your focus and get yourself ready for the next task. This part of the Pomodoro is really what makes it special, especially in the virtual workplace. One of the biggest struggles that I and most of my team members have is transitioning focus from one task to the next. With the Pomodoro, focus transitioning is a built-in feature.

So, are you ready to take on your new virtual workplace one Pomodoro at a time? To help make this a reality, please download our free Pomodoro Timer below.

Download Pomodoro Time File

Please complete this form to download the FREE file.

This field is for validation purposes and should be left unchanged.
Name(Required)

Scannability in Scripting

What is Scannability?

Scannability is an attribute of any written piece, including FileMaker scripts, that help the reader find pertinent information quickly.

Why is High-Scannability in scripting important?

  • Easier and faster way to understand the purpose and actions of the script
  • Reduced errors in comprehension of the code and recollection of the specifics
  • Reduced strain on developer’s focus

What does High-Scannability look like?

It is a clear naming convention for scripts, which looks like:

You will also find a detailed purpose/notes, clear sections of scripts, business logic details, and effective comments.


What does Low-Scannability look like?

Below is the same script without all of the above elements discussed. Consider the difference in time spent between the Low-Scannability version and the High-Scannability version. Try to imagine these different scenarios considering the difference in the two:

  1. Report to the user what the logic is for deleting time sheets.
  2. Re-enable this schedule on FileMaker Server after installing a new FMS version. Determine which day of the week to set it up for.
  3. As a developer seeing this for the first time, determine the purpose and expected result of this script.
  4. Debug an issue when creating time sheets (especially if they are not properly linked to an appointment).

What practices should developers employ to ensure their code has a High-Scannability level?

It all starts with this: Adopt the perspective of a future developer. Assume this future developer is lacking any knowledge of business logic or any other elements of the code base.

From here, make sure your code meets the following criteria:

  1. The script is easy to find within the workspace; follows clean naming convention.
  2. The purpose of the code is explicitly stated at the top.
  3. Any parameters for the script are explicitly stated.
  4. There are clear “Sections” of the script.
  5. Any calculations that are beyond the “basic” level have commenting, which can detail the expected result(s).
  6. All business logic should be commented throughout the script where applicable. The future developer should not draw questions or have to make assumptions.