Accelerating FileMaker Development with AI Code Builders
In this post, we’ll explore how AI code builders—specifically ChatGPT Code Copilot—can help you create custom JavaScript widgets for FileMaker. We’ll walk through an example of building a signature pad, discuss best practices for prompting AI, and touch on some ethical and legal considerations involved in using AI-generated code.
Why Use an AI Code Builder?
AI code builders (e.g., ChatGPT Code Copilot, GitHub Copilot, etc.) leverage machine learning models trained on large amounts of programming data. They can assist developers by
Generating boilerplate or starter code automatically
Suggesting functions and syntax in real time
Speeding up iteration on front-end features like HTML, CSS, and JavaScript
AI Code builders allow you to build a widget or page without knowing ANY programming languages.
When used correctly, these tools can save hours of coding and debugging—especially for tasks that don’t necessarily require advanced, custom logic.
Key Considerations – Ethics, Legality, and Privacy
Ethical Impact
AI-driven tools can automate mid-level coding tasks, potentially affecting developer job roles. While it streamlines certain work, the long-term impact on developer careers is worth watching.Legal Concerns
AI generators may source snippets of copyrighted code. While current U.S. legal direction makes direct infringement cases unlikely, it’s prudent to remain cautious about where the code originates.Privacy
Anything you share with an AI tool could be integrated into its broader dataset. Never upload confidential information or proprietary code without anonymizing or removing sensitive details.
Best Practices When Prompting ChatGPT
Through trial and error, the webinar revealed a handful of tips to get the best results from AI code builders
Craft a Strong Initial Prompt
Be specific about what you want, from the programming language to the functionalities and layout.
Bad Example – “Build me a signature pad using Javascript, CSS and HTML with Clear, Undo, Save and Cancel buttons.”
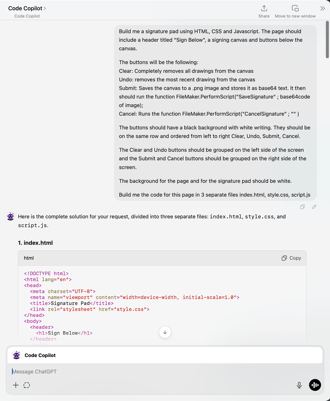
Good Example – “Build me a signature pad using HTML, CSS and Javascript. The page should include a header titled “Sign Below” a signing canvas and buttons below the canvas.
The buttons will be the following
Clear – Completely removes all drawings from the canvas
Undo – removes the most recent drawing from the canvas
Submit – Saves the canvas to a .png image and stores it as base64 text. It then should run the function FileMaker.PerformScript(“SaveSignature” ; base64code of image);
Cancel – Runs the function FileMaker.PerformScript(“CancelSignature” ; “” )
The buttons should have a black background with white writing. They should be on the same row and ordered from left to right Clear, Undo, Submit, Cancel.
The Clear and Undo buttons should be grouped on the left side of the screen and the Submit and Cancel buttons should be grouped on the right side of the screen.
The background for the page and for the signature pad should be white.
Build me the code for this page in 3 separate files index.html, style.css, script.js“
Provide Existing Code Snippets
If you’re modifying existing code, paste that code into ChatGPT’s prompt.
AI often “forgets” prior context or overwrites essential lines if you ask it to regenerate the entire codebase.
Make Incremental Requests
After generating an initial version, ask for changes in small, specific steps (e.g., “reduce the button size,” “add rounded corners,” or “change the header’s font size”).
Requesting many modifications at once can confuse the AI and lead to broken or incomplete solutions.
Ask for Only the Changes
Rather than asking for the entire file again, say “Please provide only the lines that need to be updated or added.”
This preserves previously working code and reduces the likelihood of accidental regressions.
Avoid Complex Multi-tasking
AI code builders can lose track of context during multi-part tasks. Break them down into small, separate requests.
Step-by-Step Example – Building a Signature Pad in FileMaker
Goal – Create a signature pad that captures a user’s drawing, supports undo/clear, and saves the result as a base64-encoded image inside FileMaker.
Outline Requirements
HTML – A simple layout with a canvas, header, and four buttons (Clear, Undo, Submit, Cancel).
CSS – Basic styling (button size, background color, alignment).
JavaScript – Canvas drawing logic (capturing strokes, undo/redo stacks), plus two FileMaker script calls
FileMaker.PerformScript(“Save Signature”, base64Code)
FileMaker.PerformScript(“Cancel Signature”)
Create a Detailed Prompt
In ChatGPT, specify –
“Build me a signature pad using HTML, CSS, and JavaScript, including a header titled ‘Sign Below,’ a canvas, and four buttons. The ‘Submit’ button should encode the canvas as base64 and call FileMaker.PerformScript(“Save Signature”, <base64>), etc.”Generate Files
ChatGPT returns – index.html (or combined HTML file)style.css (for layout and styling)
script.js (draw logic and button handlers)
Refine & Test
If the AI lumps HTML/CSS/JS together, ask for separate files or placeholders for easy inclusion in FileMaker fields.
Test your initial code locally (e.g., open the HTML in a browser). Check if Undo/Clear works and if Submit/Cancel behave as expected.
Integrate Into FileMaker
Store the HTML, CSS, and JS in FileMaker fields.
Use a calculation field or a “web viewer” that substitutes in the CSS/JS code.
Ensure “Allow interaction” and “Allow JavaScript to perform FileMaker scripts” are enabled in the web viewer settings.
Add Final Touches
Prompt ChatGPT for style updates (e.g., “Make the header smaller and unbold it,” “Group the Clear and Undo buttons on the left,” etc.).
Manually adjust any margins or design elements if ChatGPT’s output isn’t pixel-perfect.
Result: A working signature pad that you can open in FileMaker, draw on, and automatically store the output as a base64-encoded image—perfect for e-signatures or doodles.
Beyond Signatures – A Time-Tracking Example
The webinar also showcased a more advanced JavaScript widget – a time-tracking dashboard built entirely via AI-assisted code, then dropped into FileMaker. It features
Dynamic plus and delete buttons for line items
Light and dark modes
Start and Stop Timers
The entire front-end (HTML, CSS, JS) generated by ChatGPT with minimal manual intervention
This advanced use case illustrates how quickly you can evolve from small widgets (like a signature pad) to more complex applications—increasing interactivity and user experience within FileMaker, all powered by AI-generated front-end code.
Closing Thoughts
AI tools like ChatGPT can drastically reduce development time and open doors to front-end interactions you might not otherwise build by hand. The key is prompt engineering—learning how to give precise instructions and incremental feedback.
Remember
Always keep ethical, legal, and privacy considerations in mind.
Triple-check AI-generated code for security issues and correctness.
Use a “rinse and repeat” process – prompt, refine, test, and integrate.
By leveraging these best practices, you’ll be well on your way to creating powerful, user-friendly JavaScript widgets that enhance FileMaker’s functionality—without having to become a front-end development expert.
Further Resources
Relevant AI Platforms
Have questions or want to share your own AI-generated FileMaker widget? Drop a comment or reach out to continue the conversation. Happy coding!