Managing commodity logistics involves a complex network of buyers, sellers, and trucking manifests that must work together seamlessly. Without a centralized system, inefficiencies and miscommunication can disrupt the supply chain, leading to delays and increased costs. For 3PL providers, who are often tasked with coordinating multiple clients’ logistics needs, these challenges are even more pronounced. Claris FileMaker offers a powerful, customizable platform that enables businesses to streamline their logistics operations, providing real-time tracking and full visibility across the supply chain.
Streamlining Supply Chain Coordination
Smooth coordination between buyers, sellers, and trucking operations is critical for efficient commodity logistics. Custom systems built with Claris FileMaker allow businesses to centralize logistics data, creating a unified hub for tracking and managing key supply chain elements. For 3PL providers, this is particularly valuable, as they often juggle multiple transactions and shipments simultaneously. By offering a single platform to manage all stakeholders, Claris FileMaker ensures that everyone remains aligned and informed throughout the process.
The Role of Real-Time Tracking
In logistics, timing is everything. Real-time tracking enables businesses to monitor the progress of shipments, update stakeholders promptly, and adjust plans as needed. For 3PL providers, this level of transparency is essential for maintaining client trust and ensuring on-time deliveries. Claris FileMaker integrates real-time data updates into its logistics systems and communicates effectively with other logistics platforms, allowing businesses to track trucking manifests, buyer orders, and seller commitments in one place. This not only boosts efficiency but also provides the visibility needed to anticipate and resolve potential bottlenecks.
How Claris FileMaker Supports Logistics Management
Claris FileMaker excels at simplifying the complexities of logistics and 3PL operations. Its customizable interface enables businesses to design systems tailored to their unique workflows, from tracking trucking manifests to managing buyer and seller data. With FileMaker, companies can integrate third-party tracking tools, automate notifications, and generate detailed reports that improve decision-making. By centralizing all logistics data, FileMaker empowers businesses to optimize their supply chain operations and maintain smooth coordination across the board.
Tracking buyers, sellers, and trucking manifests is essential for efficient commodity logistics, especially for 3PL providers managing diverse client needs. Claris FileMaker offers a robust solution for streamlining logistics operations, providing real-time updates, centralized data, and seamless coordination. Interested to learn more about how Claris FileMaker can solve for logistics and 3PL management? Reach out to Kyo Logichere.
At Kyo Logic, we specialize in custom software solutions and FileMaker consulting services. During one of our recent internal projects, a team member was experimenting with Keycloak 26 on AWS and decided to create a simple, repeatable guide for future reference. We’d like to thank our friends over at Sound Essentials, who provided instructions for installing Keycloak 17 on Ubuntu 20.04.3 LTS. Our instrcutsions would not be possible without their original guidance, which we’ve modified for our own purposes.
We realized it could be helpful to share this process more broadly. Below you’ll find a step-by-step outline of how to get Keycloak 26 up and running on an Ubuntu 24.04 server in AWS, complete with MySQL and SSL certificates managed by Certbot.
Please note that Keycloak is not a FileMaker-related tool. However, as consultants who often deal with diverse infrastructure solutions—ranging from identity management to custom app deployments—it’s important for us to have guides like this in our internal knowledge base. If you have any questions about this or about our FileMaker consulting services, reach out here.
Keycloak is a powerful open‐source identity and access management solution. In this tutorial, we’ll set up Keycloak 26 on an Ubuntu 24.04 server in AWS, secure it with SSL certificates via Certbot, and configure it to run on port 443. We’ll use MySQL as our database.
Note – This guide assumes you have an AWS account and are comfortable with launching EC2 instances and connecting to them. Replace keycloak.mydomain.com with your actual domain name wherever indicated.
What You Need To Get Started
A Linux server running Ubuntu 24.04 (x86) or an account to a server hosting platform such as AWS or Microsoft Azure
A Fully Qualified Domain Name (FQDN) and access to your domain’s Domain Name System (DNS)
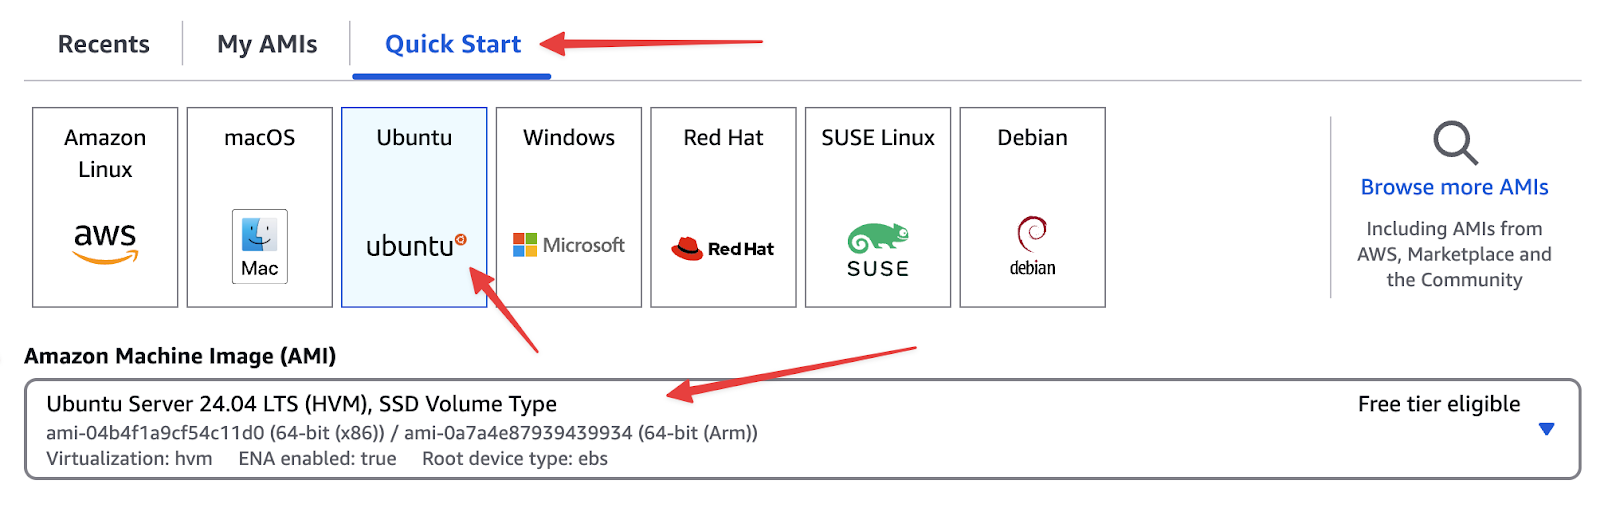
1. Create Ubuntu Server
Below are instructions for creating a server using AWS EC2. The instructions should be similar for other services.
Launch a New EC2 Instance
In AWS EC2, click Launch Instance
Select the following options
AMI – Ubuntu 24.04 (x86)
Instance Type – t3a.xlarge (or your preferred size)
Key Pair – Select or create a new key pair
Subnet – Choose an appropriate subnet (e.g., us-east-1c)
Security Groups – Ensure you have rules for SSH (port 22), HTTP (port 80), and HTTPS (port 443 and 8443).
Storage – ~30 GB recommended
IAM Role – If you have an instance profile with needed permissions, select it here (optional but recommended).
Create and Associate Elastic IP
Reserve a new Elastic IP in AWS
Associate it with your new EC2 instance
In your DNS, create an A record for the IP Address of your Elastic IP using the subdomain of your choosing.
Connect to EC2
Use AWS Systems Manager Session Manager or SSH, depending on your preference
If you click on Connect on the Instance, AWS will give you instructions to Connect.
2. Update Ubuntu
When first connecting, it’s best practice to update all packages with the following commands
sudo -i
sudo apt update
sudo apt upgrade
sudo apt dist-upgrade
sudo apt autoremove
sudo shutdown -r now
After the reboot, reconnect to your instance.
3. Install and Configure MySQL
Keycloak needs a database. Here’s how to install MySQL on Ubuntu
cd ~
sudo apt install mysql-server
sudo mysql
Set the root user’s MySQL password
ALTER USER 'root'@'localhost' IDENTIFIED WITH mysql_native_password BY 'MYSQL_DATABASE_PASSWORD';
Exit;
Secure the MySQL installation
sudo mysql_secure_installation
Follow the prompts (you can answer “Yes” to remove anonymous users, disallow root remote login, etc.).
Create the Keycloak database and user
sudo mysql -u root -pMYSQL_DATABASE_PASSWORD
In sql
CREATE DATABASE keycloak CHARACTER SET utf8mb4 COLLATE utf8mb4_unicode_ci;
CREATE USER 'keycloak'@'localhost' IDENTIFIED BY 'MYSQL_DATABASE_PASSWORD';
GRANT ALL PRIVILEGES ON keycloak.* TO 'keycloak'@'localhost';
FLUSH PRIVILEGES;
exit;
Note – Replace MYSQL_DATABASE_PASSWORD with a strong, unique password.
4. Install Certbot (for SSL Certificates)
We’ll use Certbot (via snap) to generate and manage SSL certificates.
cd ~
sudo snap install core
sudo snap refresh core
sudo snap install --classic certbot
sudo ln -s /snap/bin/certbot /usr/bin/certbot
sudo shutdown -r now
After the reboot, reconnect again.
5. Configure the Firewall
We’ll open only the necessary ports. Ubuntu’s default firewall tool is ufw
cd ~
sudo ufw allow ssh
sudo ufw allow 80/tcp
sudo ufw allow 8443/tcp
sudo ufw enable
6. Obtain an SSL Certificate
Choose your domain nameMake sure your DNS is pointed to the IP address of this instance (e.g., keycloak.mydomain.com).
Note – Replace keycloak.mydomain.com with your domain name.Obtain and verify certificate
Note – (Replace keycloak.mydomain.com with your domain name)
https-port=8443
Build and start Keycloak
cd /opt/keycloak/keycloak-26.1.0
sudo bin/kc.sh build
sudo -E bin/kc.sh bootstrap-admin user
Note – This is to create a temporary user for access to keycloak. Once in keycloak, it is recommended that a permanent user be created and this temporary user deleted.
sudo -E bin/kc.sh start
Keycloak should now be running on https://keycloak.mydomain.com:8443/.
Log into keycloak using the account created above and create a new user. Make sure to give this new user all available roles.
10. Configure Keycloak to Start Automatically
Press Ctrl+C to stop Keycloak, then create a systemd service
Create systemd unit file
Keycloak will now listen on standard HTTPS port 443, accessible at https://keycloak.mydomain.com.
You’ve successfully installed Keycloak 26 on an Ubuntu 24.04 EC2 instance, configured MySQL as the backend, and secured Keycloak with a valid SSL certificate using Certbot. You also set up systemd to ensure Keycloak starts automatically on reboot and moved it to port 443 for a cleaner URL.
Next Steps
Log in to your Keycloak admin console at https://keycloak.mydomain.com using the admin username/password you created.
Configure your realms, clients, and identity providers as needed.
Review Keycloak logs and manage system resources to ensure optimal performance.
For more instructions on how to configure your keycloak account, you can follow the instructions from our CFDG presentation on the topic here – https://youtu.be/-bqww9ggDjA
With your identity and access management solution in place, you can focus on integrating Keycloak into your applications and services! If you have any questions or run into issues, consult the official Keycloak documentation or your AWS documentation for further guidance.
That’s it! You now have a working Keycloak 26 setup in AWS. If you have any questions—or if you’d like to learn more about our FileMaker consulting services—visit us here.
After building a custom platform, it needs to be hosted somewhere. That is, all that information needs a place to “live” so it can be accessed through the web. Claris offers its own hosting solution for FileMaker called Claris Server. It’s a fantastic option for FileMaker-based platforms specifically because it integrates so seamlessly into the rest of the FileMaker ecosystem. However, there are other options available that offer their own advantages and disadvantages.
Note that there is another option: businesses can choose to host the content themselves. This typically requires dedicated employees, purchasing servers, and having space to store them. Going with a third-party option is generally more cost-effective and streamlined. Businesses may opt to use one of these hosting solutions if they’re already paying to have these companies host their website or other data.
Amazon Web Services. Amazon offers hosting services that support a wide variety of platforms. AWS is scalable and offers very flexible pricing options. AWS offers a range of services, and their databases can host FileMaker. AWS also gives subscribers a considerable degree of control over their usage. Additional servers can be up and running within minutes, if needed. AWS works with both relational databases and NoSQL.
Microsoft Azure. Microsoft offers a similar cloud solution with features that closely parallel AWS. Their databases also support NoSQL and relational databases. However, they do tend to be more expensive than AWS.
Google Cloud Databases. Google also offers hosting. However, it is only available as a cloud platform. Cloud hosting is easy-to-use, scalable, and nimble. However, because your information is only available in the cloud it is susceptible to data loss, data leakage, or even theft. Connection issues or outages could render your information inaccessible.
IBM Cloud. IBM provides database solutions that support PostgreSQL and MySQL. However, like Google, these offerings are cloud only.
FileMaker Server. For businesses utilizing FileMaker, FileMaker Server is truly the best option. It offers out of the box compatibility with FileMaker. It allows clients to open FileMaker files. Data can easily be shared with FileMaker databases and websites or other touchpoints.
Kyo Logic offers hosting solutions, and we’d be happy to walk you through these options and more. You can reach out to us here for a free consultation.
We use cookies to ensure that we give you the best experience on our website. If you continue to use this site we will assume that you are happy with it.