Kyo Logic eSignature Application – Using the Power of CLARIS FileMaker 19 to Enhance your Application

With the recent release of Claris’ FileMaker 19, developers around the world are reveling in all of its new capabilities. Today we will be taking a deeper dive into two new capabilities WebDirect Card Windows and JavaScript in Web Viewers. We will show you how they can be utilized to greatly enhance your FileMaker database.

WebDirect Card Windows

            Since the release of FileMaker 16, Card Windows have taken the FileMaker world by storm. They have allowed databases in FileMaker Pro and FileMaker Go to layer a window on top of another window as shown below.
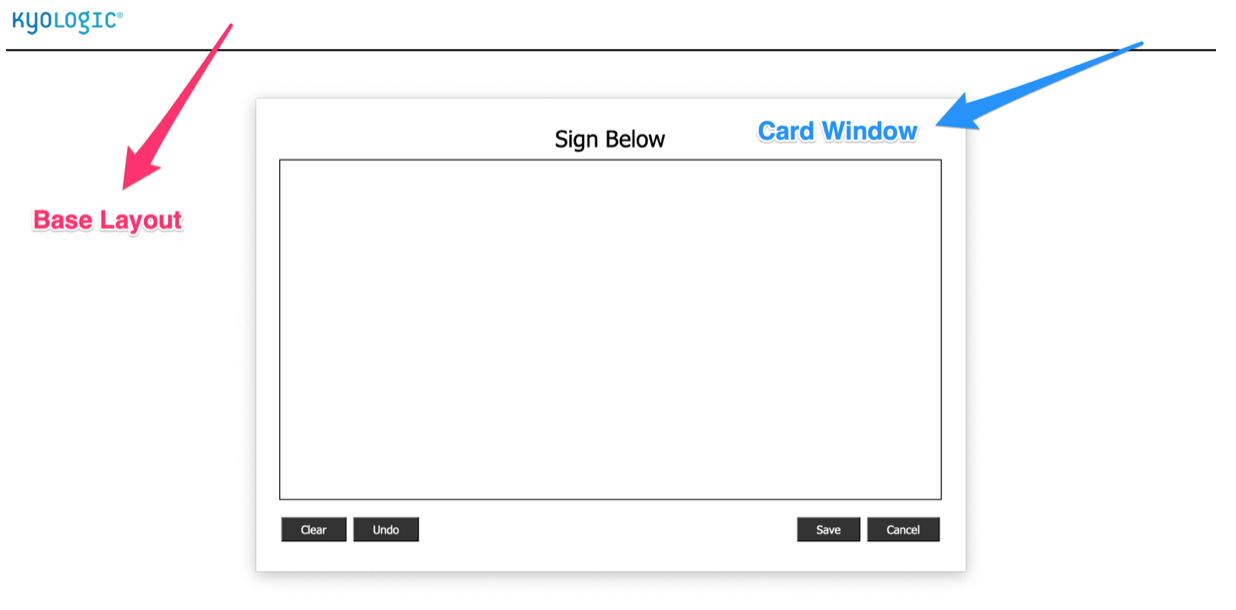
Starting with FileMaker 19, this functionality has now been brought to WebDirect!

JavaScript in Web Viewers

FileMaker has added a new function to Web Viewers called “Allow JavaScript to perform FileMaker scripts.” You can see below where to navigate to turn this on in the Web Viewer Setup.
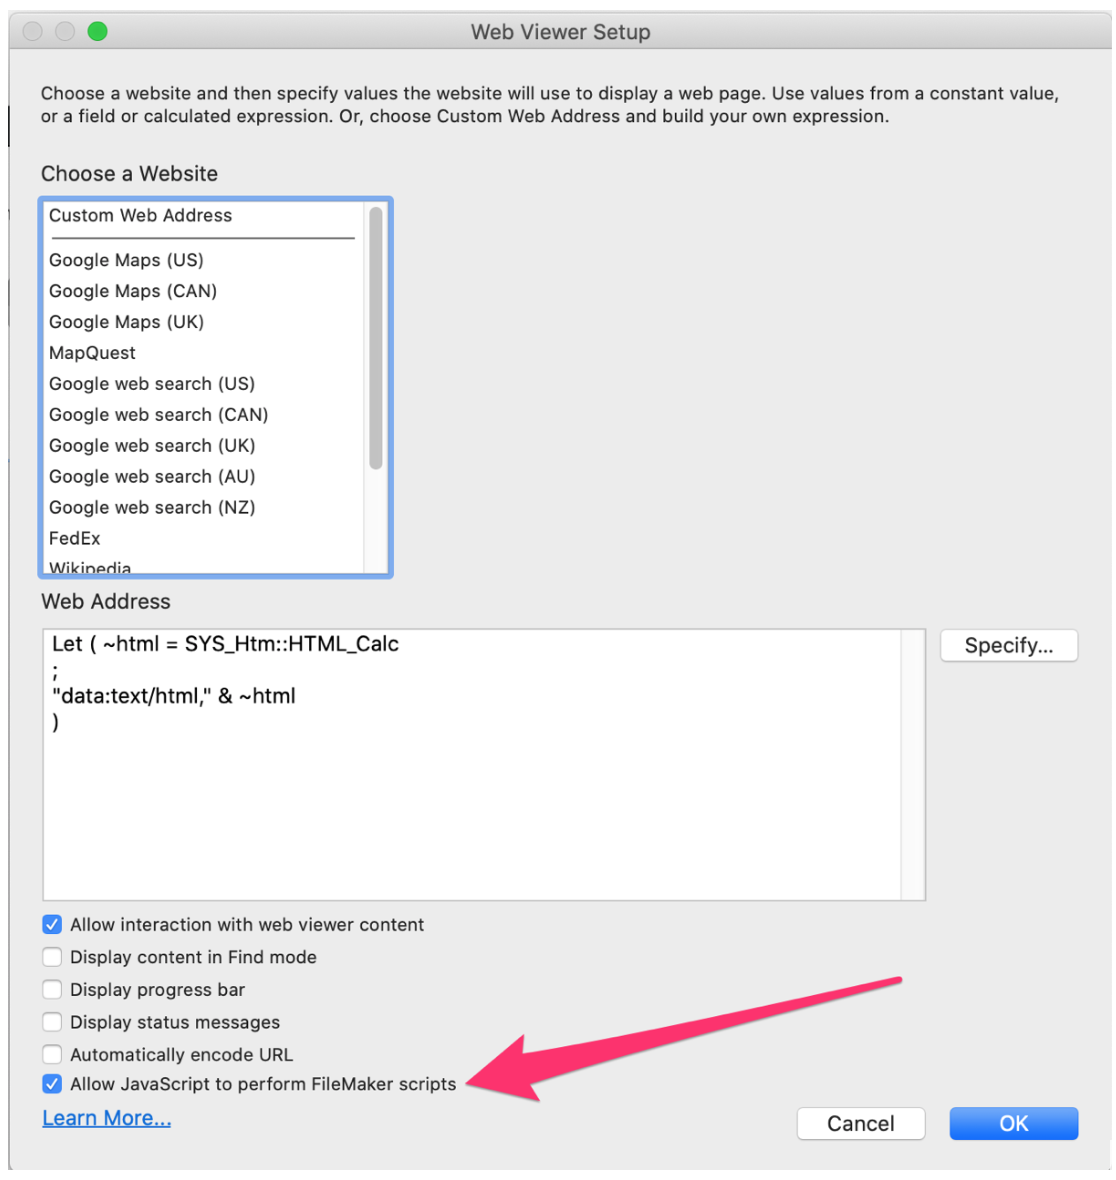
What this allows you to do is enter the below JavaScript function into the JavaScript code in your Web Viewer. This will trigger a FileMaker script to be run as a result of an action taken within the Web Viewer.

[arve url=”https://kyologic.com/wp-content/uploads/2020/05/Signature.mp4″ /]

In the eSignature Application tool we utilize the open source signature pad code provided here https://github.com/szimek/signature_pad  (Thank you Szymon Nowak!) as the base for the web viewer code.

We have set up each element of the code in its own field in the HTM_Html table and combine the individual elements into the HTML_Calc field, which is what the Web Viewer reads and displays.
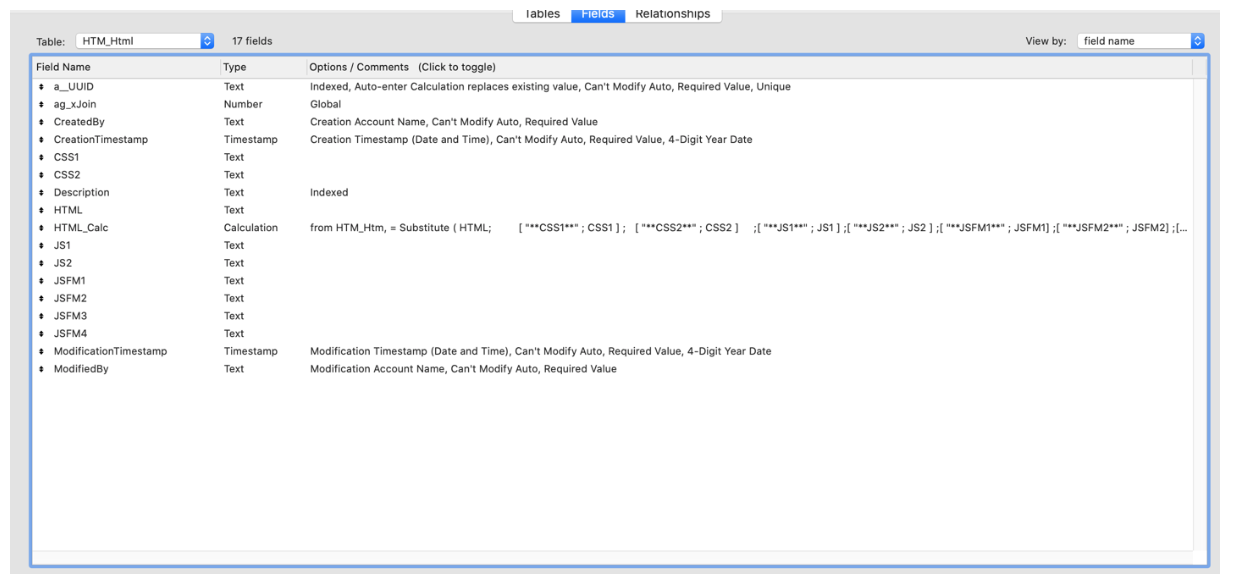
The elements in our code, which have been added to our FileMaker functions, are JSFM1 and JSFM2.

JSFM1 Is the Function that will be called upon selecting Save and JSFM2 upon selecting Cancel from within the Web Viewer.

Here is a look at what the field JSFM1 contains:
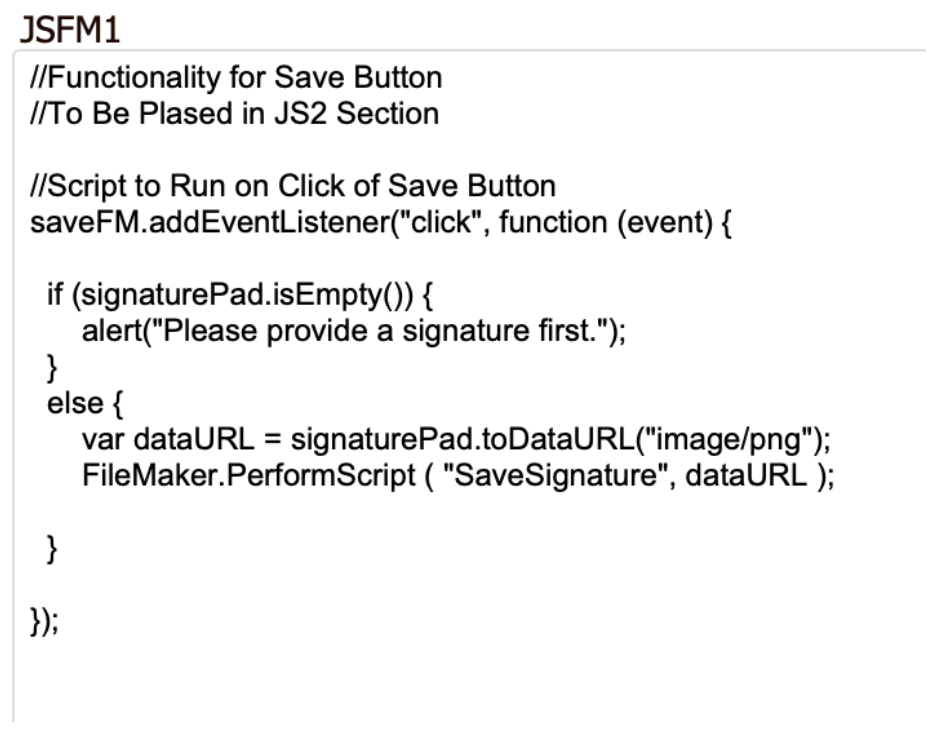
As you can see here, when the Save button is clicked the function will run and, assuming that it is not empty, will first save the image as base 64 encoded text and then run the script SaveSignature in FileMaker.
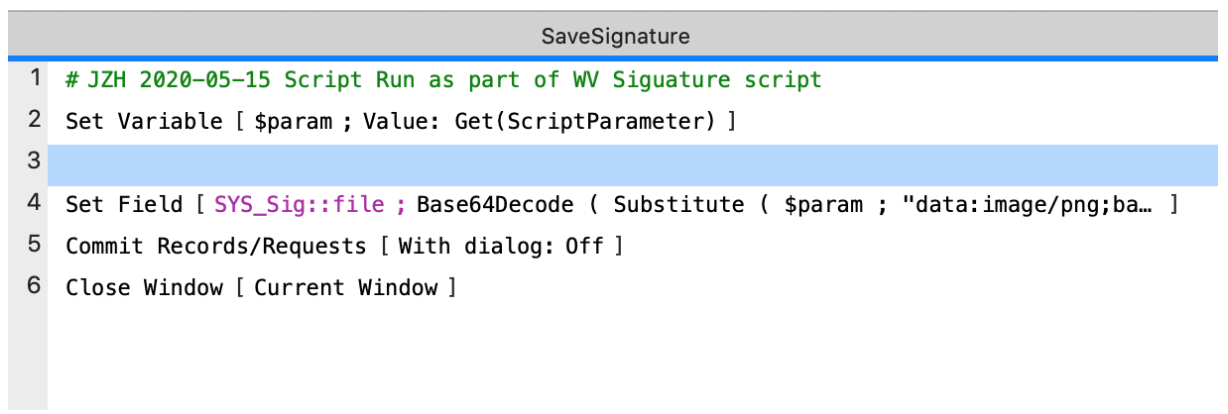
SaveSignature simply pulls in the dataURL as the parameter, decodes and formats it to be a png. Than sets it to the container field and closes the card window. It’s as easy as that. No more unnecessary data api work arounds!

It is important to note that with FileMaker 19, it is no longer necessary to base64 encode your web viewer code on WebDirect. In order for the FileMaker.PerformScript function to work from within a web viewer in WebDirect, the webviewer code cannot be base64 encoded and must start with datatext/html,

Download eSignature Application

Please complete this form to download the FREE file.

Name(Required)
This field is for validation purposes and should be left unchanged.

Up and Running with FileMaker’s IOS SDK

FileMaker Pro’s iOS SDK can make distributing your app a lot easier!  If you’re dealing with a large user base, using SDK can create a ‘launcher file’ to distribute through MDM (Mobile Device Management). This can remove the steps of having your users download FileMaker Go, by pointing them to the correct host on numerous devices.  In fact, you can keep the host address private.

Customization is a huge benefit because your app and its icon can entirely carry your own branding. If your organization has a suite of apps, your launcher file can have a custom landing page completely designed by you.

Additionally, with a launcher file, you’ll have the added benefit of better error handling.  Since your launcher file will be a local app, you can trigger your own custom messages if a user can’t reach the host file. For example, reminding them to connect to a VPN.  Perhaps you configure your launcher file with an OnFirstWindWindow trigger to open your hosted app.

In order to create your own: You’ll need a Mac, Xcode (an Integrated Development Environment that pulls all the tools needed to produce an App and is free to download), your own .fmp12 file, and the SDK.  The SDK is only available through enrolling in FileMaker’s Developer Subscription: https://store.filemaker.com/product/FDS

Once you have these four items in place, you’re ready.  You’ll need to get your hands slightly dirty with the Mac’s Terminal and Xcode, but don’t worry we’ll only be scraping the surface of these powerful applications.

Consider this a quick “getting started” guide. For further reference, you can find FileMaker’s Guide for iOS app SDK 18 here: https://fmhelp.filemaker.com/docs/18/en/appsdk/index.html

Once you’ve downloaded the SDK and have stored it in a location of your choice, it’s time to open Terminal.  You can find this in your Mac’s Application’s Utility Folder or by simply typing “Terminal” in a spotlight search.

On your command prompt, you’ll need to type in “cd,” add a space, and then type in the path of the directory that has the SDK, and press return.  In this case, it was on my desktop.

*Pro Tip: Instead of typing out the path, drag and drop the folder right into the command prompt*

At this point, you’ve navigated in Terminal to the folder that contains the SDK and we now have to run the program “makeprojdir” in that folder.  We’ll do that by typing “./makeprojdir”, a space, the project path, another space, and then the name of your app; in this case “ourApp”. Lastly, add a unique bundle identifier for your app, com.kyologic.ourApp and then hit enter. 

./makeprojdir <projectPath> <app name> <appBundleIdentifier>

*Note: The project path doesn’t need to exist; the project folder and its contents will be created as specified*

Within your newly created project folder, you’ll find a .xcodeproj file. Within the folder, “ourApp,” a PlaceHolder.fmp12 file will be swapped with our launcher file.

*In a multi-file solution you’d place all project files in this folder*

Now you’re ready to open your project in Xcode. Go ahead and click on your .xcodeproj file.  Once Xcode is loaded, open up its preferences, navigate to Accounts, and be sure to enter your Apple ID if you intend to sign this application and build it into an iOS device during testing.

Xcode is a large program and can be daunting, but we’ll only be making a few edits.  The first is modifying the configFile, which you’ll find on the left panel.  There are a number of edits you can make here, but we’re just going to highlight the LaunchSolution variable to the name of your Launcher file.

Now you’ll want to import your app icons.  You’ll find the place to drag and drop them within CustomAppMedia from within the project folder.  You’ll want these icons sized according to Apple’s Human Interface Guidelines, found here: https://developer.apple.com/design/human-interface-guidelines/ios/overview/themes/

Connect an iOS device and at the top left of Xcode choose your device and hit the play button to see your app load onto your device’s springboard.

The goal of this post was to quickly get you up and running.  It is recommended to go through the other steps in FileMaker’s iOS SDK Guide.  If you were building beyond a launcher app, you may need to enable iCloud capabilities, access the phone’s camera, location, etc.

It is important to note that the SDK is binding your FileMaker solution(s) to a copy of FileMaker Go, so all of the iOS limitations that come along with FileMaker Go still remain.  Another difference to note, the “Close File” script step will not work due to the nature of how iOS apps remain in memory and need to be quit from the app switcher.

There are tons of exciting possibilities using the SDK and we’d be excited to learn about how you use it.  If you need help configuring and deploying your own custom app, reach out to us today!