Keep up to date with the latest news and thought leadership.
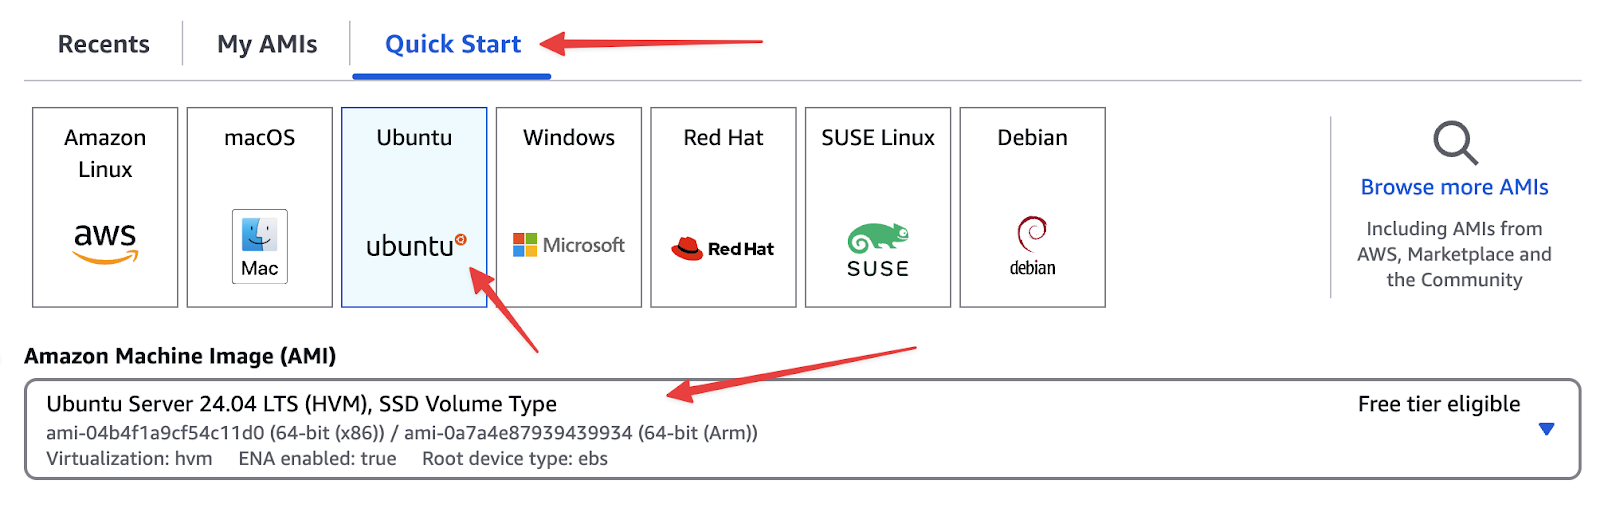
sudo -isudo apt update && sudo apt upgrade -ysudo apt dist-upgrade -ysudo apt autoremove -ysudo shutdown -r nowcd ~sudo apt install zipsudo wget https://kyologic.com/wp-content/uploads/2025/02/Open_Source_LLM.zip -O /home/ubuntu/Open_Source_LLM.zipsudo unzip Open_Source_LLM.zipsudo chown -R ubuntu:ubuntu /home/ubuntusudo chmod -R a+rx /home/ubuntusudo rm Open_Source_LLM.zipsudo rm -r __MACOSXscp -i "/local/path/to/keypairfile" -r /local/path/to/Open_Source_LLM ubuntu@your-server-ip:/home/ubuntu/cd ~sudo snap install core && sudo snap refresh coresudo snap install --classic certbotsudo ln -s /snap/bin/certbot /usr/bin/certbotsudo shutdown -r nowcd ~sudo ufw allow sshsudo ufw allow 80/tcpsudo ufw allow 8080/tcpsudo ufw enablesudo certbot certonly --standalone --preferred-challenges http -d llm.mydomain.com --dry-runsudo certbot certonly --standalone --preferred-challenges http -d llm.mydomain.comsudo systemctl enable snap.certbot.renew.timercd /etc/letsencrypt/renewal-hooks/presudo nano pre-hook.sh#!/bin/bash
# Open port 80
ufw allow 80/tcpsudo chmod +x pre-hook.shcd /etc/letsencrypt/renewal-hooks/postsudo nano post-hook.sh#!/bin/bash
# Close port 80
ufw deny 80/tcp
#Reboot Server
sudo shutdown -r nowsudo chmod +x post-hook.shsudo certbot renew --dry-run Add Admin PKI Public Key file
sudo mkdir /etc/letsencrypt/auth_keysudo nano /etc/letsencrypt/auth_key/localllm.key.pubsudo nano /etc/letsencrypt/auth_key/localllm.keysudo chown -R ubuntu:ubuntu /etc/letsencryptsudo chmod -R a+rx /etc/letsencryptcd /home/ubuntumkdir -p ~/miniconda3sudo wget https://repo.anaconda.com/miniconda/Miniconda3-latest-Linux-x86_64.sh -O ~/miniconda3/miniconda.shbash ~/miniconda3/miniconda.sh -b -u -p ~/miniconda3sudo rm ~/miniconda3/miniconda.shsource ~/miniconda3/bin/activateconda init --allconda create --name <name>conda activate <environment name>conda install python=3.9.18pip install jwt && pip uninstall PyJWT && pip install PyJWTconda install -c conda-forge sentence-transformerspip install -r /home/ubuntu/Open_Source_LLM/requirements.txtsudo shutdown -r nowsudo chown ubuntu:ubuntu /home/ubuntu/ -Rsudo chmod -R 755 /home/ubuntusudo chmod 700 ~/.sshsudo chmod 600 ~/.ssh/authorized_keyssudo shutdown -r nowexport PKI_KEYFILE="/etc/letsencrypt/auth_key/localllm.key.pub"export CERTFILE="/etc/letsencrypt/live/llm.mydomain.com/fullchain.pem"export KEYFILE="/etc/letsencrypt/live/llm.mydomain.com/privkey.pem"conda activate <environment name>python3 /home/ubuntu/Open_Source_LLM/server/fm_LLMOS_StartServer.pyc
 Install PM2 and link to your account
If you are still in the conda command, enter ^C to exit.
Install PM2 and link to your account
If you are still in the conda command, enter ^C to exit.
sudo shutdown -r nowsudo -isudo apt install npm -ynpm install -g pm2pm2 link [[Keys from PM2 Website]]shutdown -r nowconda activate <environment name>CERTFILE="/etc/letsencrypt/live/llm.mydomain.com/fullchain.pem" KEYFILE="/etc/letsencrypt/live/llm.mydomain.com/privkey.pem" PKI_KEYFILE="/etc/letsencrypt/auth_key/localllm.key.pub" pm2 start python3 --name <environment name> -- /home/ubuntu/Open_Source_LLM/server/fm_LLMOS_StartServer.pycpm2 savepm2 startupsudo shutdown -r now