What You Need To Get Started
- A Linux server running Ubuntu 24.04 (x86) or an account to a server hosting platform such as AWS or Microsoft Azure
- A Fully Qualified Domain Name (FQDN) and access to your domain’s Domain Name System (DNS)
1. Create Ubuntu Server
- Below are instructions for creating a server using AWS EC2. The instructions should be similar for other services.
Launch a New EC2 Instance
- In AWS EC2, click Launch Instance
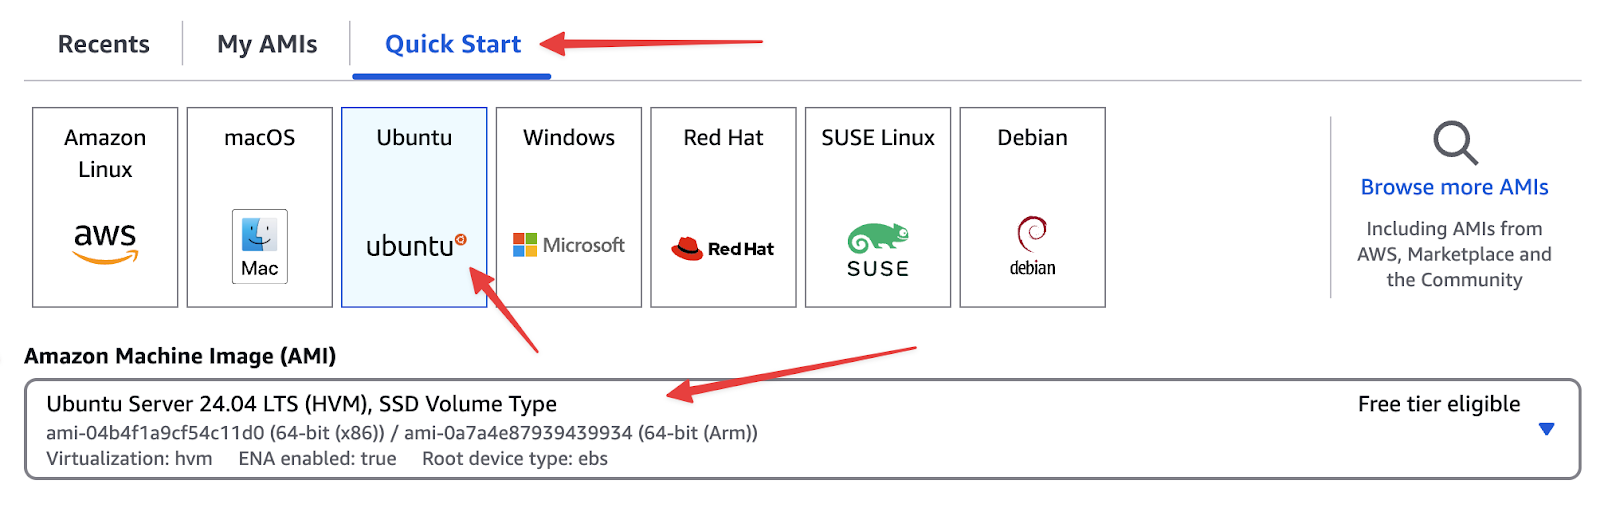
- Select the following options
- AMI – Ubuntu 24.04 (x86)
- Instance Type – t3a.xlarge (or your preferred size)
- Key Pair – Select or create a new key pair
- Subnet – Choose an appropriate subnet (e.g., us-east-1c)
- Security Groups – Ensure you have rules for SSH (port 22), HTTP (port 80), and HTTPS (port 443 and 8443).
- Storage – ~30 GB recommended
- IAM Role – If you have an instance profile with needed permissions, select it here (optional but recommended).
- AMI – Ubuntu 24.04 (x86)
- Select the following options
- Create and Associate Elastic IP
- Reserve a new Elastic IP in AWS
- Associate it with your new EC2 instance
- In your DNS, create an A record for the IP Address of your Elastic IP using the subdomain of your choosing.
- Connect to EC2
- Use AWS Systems Manager Session Manager or SSH, depending on your preference
- If you click on Connect on the Instance, AWS will give you instructions to Connect.
- Use AWS Systems Manager Session Manager or SSH, depending on your preference
2. Update Ubuntu
When first connecting, it’s best practice to update all packages with the following commandssudo -isudo apt updatesudo apt upgradesudo apt dist-upgradesudo apt autoremovesudo shutdown -r now3. Install and Configure MySQL
Keycloak needs a database. Here’s how to install MySQL on Ubuntucd ~sudo apt install mysql-serversudo mysqlALTER USER 'root'@'localhost' IDENTIFIED WITH mysql_native_password BY 'MYSQL_DATABASE_PASSWORD';Exit;sudo mysql_secure_installationsudo mysql -u root -pMYSQL_DATABASE_PASSWORDCREATE DATABASE keycloak CHARACTER SET utf8mb4 COLLATE utf8mb4_unicode_ci;CREATE USER 'keycloak'@'localhost' IDENTIFIED BY 'MYSQL_DATABASE_PASSWORD';GRANT ALL PRIVILEGES ON keycloak.* TO 'keycloak'@'localhost';FLUSH PRIVILEGES;exit;4. Install Certbot (for SSL Certificates)
We’ll use Certbot (via snap) to generate and manage SSL certificates.cd ~sudo snap install coresudo snap refresh coresudo snap install --classic certbotsudo ln -s /snap/bin/certbot /usr/bin/certbotsudo shutdown -r now5. Configure the Firewall
We’ll open only the necessary ports. Ubuntu’s default firewall tool is ufwcd ~sudo ufw allow sshsudo ufw allow 80/tcpsudo ufw allow 8443/tcpsudo ufw enable6. Obtain an SSL Certificate
Choose your domain nameMake sure your DNS is pointed to the IP address of this instance (e.g., keycloak.mydomain.com). Note – Replace keycloak.mydomain.com with your domain name. Obtain and verify certificatecd ~sudo certbot certonly --standalone --preferred-challenges http -d keycloak.mydomain.com --dry-runsudo certbot certonly --standalone --preferred-challenges http -d keycloak.mydomain.comsudo ufw deny 80/tcpsudo systemctl list-units --type timersudo systemctl enable snap.certbot.renew.timersudo systemctl status snap.certbot.renew.timercd /etc/letsencrypt/renewal-hooks/presudo nano pre-hook.sh# Open port 80
ufw allow 80/tcpsudo chmod +x pre-hook.shcd /etc/letsencrypt/renewal-hooks/postsudo nano post-hook.sh# Close port 80
ufw deny 80/tcp
#Reboot Server
sudo shutdown -r nowsudo chmod +x post-hook.shsudo certbot renew --dry-run7. Install Java & Other Dependencies
Keycloak 26 requires Java 17 or later. Let’s install OpenJDK 21sudo apt install openjdk-21-jdk8. Download and Prepare Keycloak
sudo apt install zipsudo mkdir -p /opt/keycloakcd /opt/keycloaksudo wget https://github.com/keycloak/keycloak/releases/download/26.1.0/keycloak-26.1.0.zipsudo unzip keycloak-26.1.0.zip -d /opt/keycloaksudo rm keycloak-26.1.0.zipsudo groupadd -r keycloaksudo useradd -r -g keycloak -d /opt/keycloak -s /sbin/nologin keycloakcd /optsudo chown -R keycloak: keycloaksudo chmod -R 755 /opt/keycloak/keycloak-26.1.0/bin/sudo chmod -R 755 /etc/letsencrypt9. Configure Keycloak
Edit Keycloak configurationsudo nano /opt/keycloak/keycloak-26.1.0/conf/keycloak.confdb=mysqldb-username=keycloakdb-password=MYSQL_DATABASE_PASSWORDhttps-certificate-file=/etc/letsencrypt/live/keycloak.mydomain.com/fullchain.pemhttps-certificate-key-file=/etc/letsencrypt/live/keycloak.mydomain.com/privkey.pemhostname=keycloak.mydomain.comhttps-port=8443cd /opt/keycloak/keycloak-26.1.0sudo bin/kc.sh buildsudo -E bin/kc.sh bootstrap-admin usersudo -E bin/kc.sh start10. Configure Keycloak to Start Automatically
Press Ctrl+C to stop Keycloak, then create a systemd service Create systemd unit filesudo nano /etc/systemd/system/keycloak.service# /etc/systemd/system/keycloak.service
[Unit]
Description=Keycloak Server
After=syslog.target network.target mysql.service
Before=httpd.service
[Service]
User=keycloak
Group=keycloak
SuccessExitStatus=0 143
ExecStart=!/opt/keycloak/keycloak-26.1.0/bin/kc.sh start
[Install]
WantedBy=multi-user.targetsudo systemctl daemon-reloadsudo systemctl enable keycloaksudo shutdown -r nowsudo systemctl status keycloak11. Changing to Port 443
Adjust keycloak.confsudo nano /opt/keycloak/keycloak-26.1.0/conf/keycloak.confhttps-port=443cd /opt/keycloak/keycloak-26.1.0sudo bin/kc.sh buildsudo ufw delete allow 8443/tcpsudo ufw allow 443/tcpsudo shutdown -r nowPatrick is an intelligent and quick-thinking problem solver who thrives under pressure, priding himself on his promptness and analytical skills. He enjoys learning new things and tackling challenges that keep his mind sharp. Outside of work, he values time with family and friends, enjoys playing and watching sports, and is actively involved in his church. With a strategic mindset and a great sense of humor, Patrick prefers the comforts of home, where he can watch a great movie, design and play board games, or take on a challenging jigsaw puzzle.